Saturday, March 31, 2012

Make Your Own "Smelly Jelly"

I love to burn candles, but I can't always have them lit  because of Emmy and 2 horrible little kitties that could cause accidents.  This is especially true in our bathroom.  We keep the bathroom door closed at all times (to keep children and animals from unrolling the TP), and burning candles in a closed room is a huge no-no.  So, to freshen the air in those rooms, I use "smelly jelly."  Some people call these "flameless candles," but no matter what you call it, it serves the same purpose.


What you'll need:

1 jelly jar (8 oz)
1/2 cup boiling water
1 envelope non-flavored gelatin
1/2 cup cool water
1/8 teaspoon vodka
1/2 teaspoon essential oil (your choice of fragrance, see notes below)
food coloring, optional

Directions:
  1. Empty gelatin mix into jelly jar, add boiling water and stir to dissolve.
  2. Add cool water and stir thoroughly.
  3. Add vodka and sitr thoroughly.
  4. Add essential oil and stir thoroughly.
  5. If desired, add food coloring for tint; stir thoroughly.
  6. Let cool for about 30 minutes.
  7. Screw lid on jar (tightly) and shake very well.
  8. Place in freezer for about 15-20 minutes, or until set.
  9. To use, remove lid.
Notes:
  • Replace lid when not in use.  This will ensure that your smelly jelly lasts for several weeks.
  • Keep away from heat or direct sunlight.
  • When choosing a scent, try to choose scents in their purest form (for longer life and stronger smell).  If you choose a scent that is a mixture of scents, it will not work nearly as well.
  • When adding color, add only one drop at a time (this will ensure that no food coloring gets wasted).  To achieve the bright blue color you see above, I used only 3 drops of blue food coloring.

Friday, March 30, 2012

Spiced Pretzels


2 cups pretzel sticks
2 tablespoons honey
1 teaspoon salted butter, melted
1/2 teaspoon chili powder
1/2 teaspoon onion powder

  1.  Preheat oven to 350 degrees.
  2. Spray cookie sheet with non-stick spray.
  3. In a small bowl, combine honey, butter, chili powder, and onion powder.
  4. Place pretzels in a large bowl and drizzle honey mixture over pretzels.
  5. Toss to coat and spread onto cookie sheet.
  6. Cook for 4 minutes, stir, cook for 3 more minutes.
  7. Cool on a wire rack.
  8. Store in an airtight container.

1/2 cup serving = 115 calories

Thursday, March 29, 2012

Most Versatile Playpen EVER!


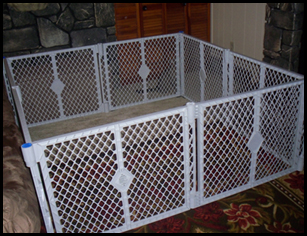
For Emmy's first birthday, we bought her this playpen with 1 extension kit.  Since then, I have found a cornucopia of ways in which to use this awesome little enclosure.


As a Standard Playpen:


As a Play Area (enables play on couch):


As a Gate (blocks doors and entry ways):


As a Guard (for furniture and cabinets):


As a Toy (a tent/tunnel/fort):


As you can see, this playpen has really grown with her.  It has been the best purchase I have made thus far.  It's a great enclosure, and it folds fairly flat for storage.  Though, I did not take a picture of the folded state.  It also comes with a nice removable handle that you can use when transporting it.

Wednesday, March 28, 2012

Fiber Up Minis


These awesome little miniature bottles (5 oz) of water contain 0 calories, 3 grams of fiber, calcium and vitamin C.  It comes in a variety of flavors, including: Apple Slice, Cherry Love, Cranberry Crush, Grape Smash, Lemon Up, Lime Shaker, Mango Groove, Orange Slam, Original Rain, Peach Dream, Strawberry Bite, and Watermelon Wammy.  The flavoring is contained in the cap of the bottle.  "When you drink FIBER UP, you are tasting the fruit flavor for a short time and then it will disappear, except for the vibrant color of the fruit extract."  Click here to visit their website.

Monday, March 26, 2012

Alternate Uses for Hair Conditioner

For years I kept telling my husband that he should condition his hair, but he always considered it too girly.  Eventually I convinced him (after a bout of extremely dry skin on his scalp).  He doesn't use the "froufrou" conditioners, which is fine by me, because it allows me to use his cheaper brand for other household things without feeling any guilt over wasting money.  In some cases, it can even replace household items that might be harsher on your body or the environment.
  1. Washing Silk:  You can hand wash your silk garments in a sink full of warm water.  If you add just a tablespoon of conditioner, it will "freshen" the garment and keep it soft.  Rinse well and air dry.
  2. Shine Stainless Steel:  Apply conditioner to stainless steel items and rub conditioner off with a soft cloth.
  3. Shave Your Legs:  Apply a thin layer of conditioner to legs and shave as usual.  The conditioner will soften your hair (making it easier to shave) and your skin.  I have found that the cheaper the conditioner, the better your shave will be!
  4. Remove Makeup:  Use a small amount of conditioner to remove the makeup from anywhere on your face.  This should go without saying, but be cautious when removing eye makeup.
  5. Loosen Your Ring:  Can't get that ring off your finger?  Apply conditioner and... voila!
  6. Oil Wheels:  Rub conditioner on the axles of rollerskate, rollerblade, or skateboard wheels to stop them from sticking or making noises.

Sunday, March 25, 2012

10 Uses for Distilled White Vinegar


Make your home a little greener by using distilled white vinegar for some of your household chores that regularly use harsher products.
  1. Carpet Spot Remover:  Mix equal parts distilled white vinegar and cornstarch.  Spread onto spot, working into carpet with a washcloth.  Let dry for at least 24 hours, preferably 48.  Vacuum over, and the spot should "lift" with the vacuuming.  Don't forget to spot test the carpet first, in an inconspicuous place.
  2. Eliminate Mildew:  Use a spray bottle to apply vinegar on any surface that is mildew-prone.  This works great on the shower curtain or bottoms of rugs in the bathroom.
  3. Shine Silver:  Mix 1/2 cup vinegar with 2 tablespoons baking soda.  Use this as a soak for silverware or sterling jewelry.
  4. Clean Your Microwave:  In a microwave-safe bowl, mix 1 cup water and 1/4 cup vinegar.  Sit bowl in middle of microwave and nuke for 5 minutes.  When mixture has cooled enough to handle, use it with a sponge to wipe down the inside of the microwave.
  5. Air Refresher:  If you cook something that "invades" your home's air (such as seafood), mix 1 cup of water and 1/2 cup vinegar in a small saucepan.  Boil until the liquid is almost gone.  The vinegar smell will not linger for long.
  6. Whiten Grout:  Use a toothbrush dipped in vinegar to scrub at the grout between the tiles.
  7. Clean Your Washing Machine:  Add 2 cups of vinegar to your washing machine and run as usual without anything else in the machine.
  8. All-Color Bleach:  Brighten your loads by adding 1/2 cup vinegar to the wash cycle.
  9. Disinfect Toilet Bowls:  Pour 2 cups vinegar into toilet and let sit overnight, if possible.  Flush in the morning.  Do this once a week.
  10. Clean Eyeglasses:  Apply a few drop of vinegar to a soft cloth and wipe glass lenses.

Friday, March 23, 2012

Abeego Reusable Food Storage


This reusable food storage option is made from 55% hemp and 45% cotton fabric.  Each wrap is infused with beeswax (for antibacterial properties) and plant extracts (for antimicrobial properties).  They come in three different shapes/sizes: snack, wrap, and square.  Average life of these products is about 1 year.  Prices range from $11 to $15.  To see what these products are all about or to buy, click here.

Wednesday, March 21, 2012

DIY Children's Sling Bookshelf

I'm going to show you how to create a child's sling-style, wall mounted bookshelf.  These normally can run anywhere from $30-$100, depending on the style and quality.  You can make one of these yourself for only a few dollars, especially if you have the scrap fabric on hand.  For reference, home improvement stores like Lowes and Home Depot sell the mounts and curtain rods cheaper than most other places.  However, I really like some of the Walmart versions, so those are the ones I linked to below.

Things you'll need:

Sewing machine (not necessary, but quite helpful)
Fabric & thread
Double cafe rod mount
2 cafe curtain rods

Simplified How To:
  1. Hang your rod mounts on the wall; be sure to measure accurately so the bookshelf will hang straight.
  2. Place rods into mounts and measure the width (this will be the width of your fabric, and ultimately, your bookshelf).  Measure from the inside of the left mount to the inside of the right mount.
  3. Sew your rectangle of fabric.  The width of the fabric should match the width of the mounts (as determined in Step 2 above).  The length should be long enough to wrap around the bottoms of books, creating a sling.  I have found that 14 inches is a good length (but allow a few more inches to account for the loops that you will have to sew at the ends).
  4. Sew the loops at the ends of your rectangle of fabric.
  5. "Thread" fabric onto cafe rods and place books in the sling.

Cross-Section Example:

I know this drawing is very crude, but I hope you'll still get the general idea.  ;)


For Emmy's bookshelf (pictured below), I used decorative mounts that were actually a little pricier.  I wanted triple cafe mounts (in case I wanted to add an extra sling later).  The triple cafe rod mounts can be purchased here.  The rod mounts only come in black, so if you want a different color, you'll have to paint them like I did.  Because her shelf displays her Serendipity book collection (which consists of over 50 books - and growing!) we couldn't use standard cafe rods.  With so many books, the sling was too heavy and the rods began to bow.  Needless to say, I had to have steel rods cut to length and then rounded off on the ends (to prevent any injury).   I want to add decorations to the ends of the rods, but I haven't found any that I really like yet.